March 18, 2024

Have you used your talents lately?

This recent economic upheaval  has taken many of us, and put us in a position to do some soul searching in regards to what we should do next. This could be a real blessing in disguise. How many people have buried what they do best under an unfulfilling career, and ignored latent talents? I have had to do different jobs for practical reasons, but I have nurtured what I love the most.   I must say my #1 talent is creating wonderful renovated living spaces.  I am one that must be doing something all the time. I operate this way almost  to the point of it being a fault! My work is only as good as the effort I put into it! Even when I am sitting down at the end of a hard work day, my mind is strategically planning my next working day. Why do I give so much time to my work?  Because I love it! It makes me feel good to utilize my talent and I can see my accomplishments. My passion doesn’t always pay me money, but it always offers me satisfaction! Fostering your talents, and seeing yourself mature past another time in your life, is incredibly rewarding.

I challenge each of you to focus on your talents. Yes we all have something that we do better than the average person. We are all gifted in some way! Putting energy into your talents will not only make you feel good about yourself but motivate you to do something that pertains to that talent. So no matter how big or small your talents are, use them! We are only as good as we allow ourselves to be! Spend time using your talents and I promise you will feel awesome about yourself and what you can accomplish! Yes we are all average people, but each of us have something we do that makes us above average and shine.


A Simple Painting Tip for Your Plaster Walls

As many of you know  we at Southern Smarts love our renovating projects. We also love old  houses, and bringing them back to life is a passion for us. There is a simple DIY  painting tip when painting plaster walls in an older home that can hide a multitude of sins where settlement issues become apparent.

The simple answer is a good quality of “Flat” finish paint. When using a semi gloss, high gloss or eggshell on old plaster you will find any blemishes are highlighted and become extremely visible. A flat finish paint definitely camouflages the imperfections on the surface of the walls.

Now we know the best way to take care of this would be to “Skim Coat” the walls and sand. But hiring professionals to do this can be expensive. If you are looking for a quick fix that is extremely economical, it is as simple as the finish of the paint you plan to use.

Hope you find this quick tip helpful and thanks for visiting us here at Southern Smarts!


Finding the Joy in the Journey.

When life suddenly scaled things down with the subtlety of an F5, I had to regroup on most things. Gone were the days of chartered boating, upscale resorts, and divine city dining. This lifestyle change may have adjusted my itinerary, but it has not changed my wanderlust, and curiosity for what may be around the next bend. Therefore, In my travels, I have reached out, and made incredible journeys into my own.

Locally, I have discovered an ethereal coastal compound for wild horses, that have inhabited this extraordinary island for hundreds of years. I happened on a bird sanctuary, that rehabilitates birds of prey, and fosters and guards its local eco system. I have toured  historic buildings to better understand my local history. I have happened on locally grown treats at state highway roadside markets, that make it more than worth the diversion. I have found characters in small, rural towns, that have turned their passions into content for national documentaries.  I have enjoyed views from day hikes that can be postcard perfect, and sunset kayak excursions on local rivers, that would be worth a much longer trip.

I am grateful for the five star resorts, and the first class seats, and all the luxury of a different time. But for now, I am tuned into a fresher, deeper, and more mature adventure. I am enjoying rich and simple discoveries in my own backyard. “The Joy of the Journey”

Andi Bartruff

Contributing Writer/Southern Smarts


Southern


From a Sows Ear to a Silk Purse. Oak Island Beach Cottage.

In 2004, I was on the hunt for a beach cottage. I did not want something that someone else had already renovated I wanted to put our own spin on it. The deals are out there, especially now with the real estate market being what it is today. Having a sweet summer, weekend, or retirement getaway is quite affordable if you are willing to put that old “sweat equity” into play. That’s exactly what we did. When I was looking there was not much on the market that I would term affordable. One weekend I was invited to a friend’s home on a quiet and quaint barrier island off the NC coast, Oak Island. My friends had purchased property there and really wanted us to do the same. While we were searching we came across this horrible little “shack” on a double lot on the beach side of the island. It came complete with a junkyard on one side of the lot and the house, well it looked like it was a tear down.It had to be one of the worst properties I had ever considered. Rotten siding, decrepit porch, built out of cinderblock, and the interior was a mess! When we say a mess, one cannot imagine that the smell of cat urine and the fleas jumping on our legs were the only stimulation that we got as we toured the place with our Realtor.

Through vision and flea bites we could see the good bones. The home had vaulted beamed wooden ceilings and a fireplace. The kitchen, which appeared to be an addition, was large in comparison to the rest of the cottage. There was a partially built side addition with a large window in the front. It had a large backyard full of the islands name sakes, live oaks.

As you view the before and after photos you will be able to get the drift on how bad this little place was. The cottage is built predominantly with cinder block which is good from a possible hurricane perspective, but aesthetics on the interior with cinderblock walls was not going to work. To counteract this problem I decided to stucco all the interior walls. this was a daunting task, with potential for serious “carpel tunnel”.  I can tolerate  a little pain for fashion.

As budget was minimal we were going to do all the work ourselves, and had 90 days to bring it to completion. With this being a “fun house” I decided to let my imagination run wild where color was concerned. I selected a wonderful light green named ‘Independent Gold” with Sherwin Williams paint for the living, dining and small den. For the kitchen, I decided on a bright purple,  a periwinkle blue for the Master bedroom, and a bright gold for the guest room. With cement floors and a limited time frame, we decided on a glue down wood parquet for the floors as carpet was a non option with kids, sand etc. The small den had wood planks for flooring, and I painted them a bright white high gloss. For the exterior we were going to go with bright coral for the body of the house, purple for the peaks, and “Atlantic Green” for the shutters. We would  trim the house in white. We also added a deck on the right side and front, and built a covered front porch with decorative molding. The house felt dark, so we resolved this problem by using full French doors on the front and side entrances.  This enabled bright sunshine to enter the house, plus gave the house a real beach bungalow feel. For the interior, to keep the space feeling as open as possible, I opted to use full french doors for the bedrooms as well. For privacy I installed shades on the back of the doors so they may be closed for guest and family. This kept the interior bright and open.

Once all the construction work was complete, it was time to address furnishing the place. Now I am a flea market tag sale kind of guy. I knew I had some great old things in the basement, that with a  little updating and paint, would be fun, economical, and downright interesting. I wanted the place to have personality, be chic, welcoming and comfortable.

Upon arriving back in the city, I started my quest to get the house ready for my first week at the beach. I stopped by my local shops and found some very interesting fabric remnants.  I painted lamps and table,s and made three upholstered headboard which I covered with a plain off white canvas purchased at my local home improvement store. All I have to say is thank goodness for electric staple guns. They sure make the job a lot faster and with greater ease.

The end result is a great stylish little beach retreat that brings me more joy and relaxation than I could have ever imagined, and it cost a fraction of what I thought.  As a matter of fact. my beach neighbors loved what we had done so much, they asked us to consult as they prepared to redo their little cottage. We will be posting a story on that renovation in an upcoming article.

Remember style and comfort do not have to cost an arm and a leg. It just takes a little imagination. And if you find yourself cruising down Oak Island Blvd, feel free to stop by “Not The Hamptons ” and say hello. The iced tea with a hint of mint is always chilled. 🙂

Chabby 😉


Cutting Edge Color! Tangerine

‘Tangerine Tango”: a bright, burnt orange hue was named 2012 Color of the Year by the Pantone Color Institute. here are three ways to incorporate this color, reminiscent of a sunset, in a home.

“Stage it with Accessories.”

A moderate amount of tangerine tango can add just the right amount of pop with pillows,throws tabletops accessories. Pair it with gray-scale neutrals for a modern flair.

“Mix it in the Kitchen”:

Some homeowners are choosing this sunset hue for kitchen appliances to add an extra colorful touch!

“Brighten up a wall”:

Try a painted accent wall in tangerine tango to create a “dynamic burst of energy” in the kitchen, entryway, or hallway!

Have fun and don’t be frightened to experiment..After all: It’s only paint! 🙂

Chabby


5 Low Cost Kitchen Redos.

The kitchen is the focal point in many homes. And it’s one of the features, should you decide to ever sell, that potential buyers compare most closely when they are shopping for a home. Here are cost estimates for some low-cost kitchen upgrades that can give you a  real “POP” without breaking the bank.

1. Hardware

replacing cabinet hardware such as handles, knobs, and hinges is a quick, DIY way to enhance kitchen space. According to houselogic.com, an average kitchen is 200 sq feet with 30 linear feet of cabinetry,which equates to about 40 handles and knobs. averaging between $2.00 and $20.00 per knob or pull, a homeowner can expect to spend between $80.00 to $800.00 for this enhancement.

2. Faucet

There are a myriad options today in terms of height, spouts, pullout hoses and folding necks, with quality faucets starting at around $200.00.

3. Lighting

Adding an LED under-cabinet light can have a dramatic effect for around $40.00

4. Organization

Practical storage in the kitchen will go a long way. Over the door hooks, baskets in the Pantry, drawer organizers, wall hooks for pots and pans and stackable shelves for cabinets will add appeal, typically for less thank $100.00. Make your kitchen appear cook friendly.

5. Countertops

Laminate can mimic the contemporary look of granite at a significant discount. The cost for the average kitchen with 30 linear feet of laminate countertops is roughly $1575; the same space in granite would be about $2400.00

Lean times call for a budget when it comes to Home Maintenance!

I am always on the hunt for articles and additional information to provide our readers that they may find helpful. This article from Money Magazine jumped off the page and I sure hope you all find it both helpful and informative.

(MONEY Magazine) — Lean times call for budgetary triage. But while you should clearly opt for orthodontics before Disneyland, the choice is tougher when it comes to home maintenance.

Should you get a paint job or a new furnace? “There’s no homeowner’s manual that tells you when to do what,” says Naperville, Ill., home inspector and structural engineer Mark Waldman

Emergencies aside, the project that could cause the most damage and expense if left unfixed is the priority. Below, the order in which to tackle your biggest repair needs.

https://asperformance.com/uncategorized/odmg7rx6vc1 1. Electrical system

Wiring problems claim the No. 1 spot for good reason: They can lead to fires and electrocution. “That trumps everything,” says Waldman.

https://www.goedkoopvliegen.nl/uncategorized/sydotoeg Danger signs: Circuit breakers that trip frequently, lights that dim when you turn on the vacuum or outlets that are loose, hot, or accept only two-prong plugs.

How to check: Spend $300 to $500 for a licensed electrician to open up your main panel to look for trouble and to tighten any loose connections. He’ll also spot-check switches, outlets and light fixtures to ensure that the wiring is in safe working order

Replacement cost: $4,000 to $10,000 to rewire the house.

https://www.worldhumorawards.org/uncategorized/gvaqhtc Prolong its life: Flip every circuit breaker off and on again once a year to prevent corrosion. Add new circuits ($100 to $500 each) to take the heaviest electrical loads, like window air conditioners, off the old wires.

2. Basement

Structural problems downstairs mean shifting and cracking upstairs — at the very least — so there’s little point in doing other repairs until you’ve fixed the building’s foundation.

https://giannifava.org/4hp5c2s Danger signs: Bowed or split beams, rotted posts, piles of sawdust (evidence of wood-boring insects), tiny mud trails (indications of termites), or large cracks in the masonry foundation — especially if the cracks are horizontal, which tends to indicate a bigger problem.

Buying Tramadol Online Legal How to check: A contractor will usually take a look free of charge. If he recommends significant repairs, hire a home inspection engineer (find one at Tramadol Buy Overnight nabie.org) to investigate ($350 to $500).

Replacement cost: Major foundation work can cost $3,500 to $8,000; new posts or beams could run $1,200 to $2,500.

Buy Cheap Tramadol 100Mg Online Prolong its life: Water is the cause of cracked concrete, rotten timbers and wood-eating pests. So keep your basement dry by making sure the landscape slopes away from the house and maintaining the next two items on the list: the roof and gutters.

3. Roof

Water leaking into your home from above can lead to a host of pricey problems: rot, insects, electrical shorts and mold.

Danger signs: Dampness or stains on ceilings; curling, missing, or broken shingles; smooth spots where the granules have worn away; green algae growth.

https://www.jamesramsden.com/2024/03/07/j6tcyof How to check: Have a roofer inspect your home. This is typically free, but the pro, of course, is looking for business. So check the company’s reputation at angieslist.com ($5 a month).

https://elisabethbell.com/y40503gdsb Replacement cost: $5,000 to $15,000

Buy Cheap Tramadol Online Prolong its life: Prune tree limbs so they’re at least 10 feet from the roof to keep squirrels away and to let moisture evaporate quickly after storms. If shingles blow off, replace them immediately, and repair small leaks promptly.

https://asperformance.com/uncategorized/ce2jw340hly 4. Gutters

Your gutters are just as important as the roof. The only reason they’re lower on this list is that if you replace gutters first, they’re likely to get damaged when you reroof later. So if you need a roof too, it’s better to wait — or do both projects at the same time.

Can You Order Tramadol Online Danger signs: Dented or disconnected gutters, pooled water around your home’s foundation, or basement flooding near the downspouts.

How to check: Head outside during a rainstorm and watch the gutters in action, says Caitlin Corkins, stewardship manager for Historic New England, which maintains dozens of historic properties. “The best time to see clogs and overflows is when the system is working,” she says.

https://giannifava.org/o4ze7w2cd Replacement cost: $1,500 to $3,000

https://tankinz.com/kckdorj Prolong its life: Hire a gutter company to clean, check, and repair your gutters ($100 to $200) at least once a year — two or three times if you’re in a wooded area. And have someone clear the eaves of deep snow to prevent icing, which can split open gutters or rip them right off the house.

Buying Tramadol 5. Exterior walls

“People think paint is just a decorative element, so they let it go,” says Robert Niemeyer, a Winston-Salem, N.C., handyman, contractor, and electrician. But without a weather-tight seal, water can infiltrate the siding, causing rot.

and attracting wood-damaging insects. Still, leaks from a vertical surface generally aren’t as quick or lethal as ones from a roof and gutter.

https://musiciselementary.com/2024/03/07/4j9qnzmo Danger signs: Paint that’s peeling, cracking or blistering

https://worthcompare.com/zubzh2717qp Replacement cost: $4,000 to $10,000; make sure the painters replace loose putty around the window glass and caulking gaps around molding

http://countocram.com/2024/03/07/h9d9thrixkg Prolong its life: Hire a pro to do touchups every year. Trim foliage so it’s at least a foot from the house, and kill any mildew growth with a bleach-and-water solution.

Where To Get Tramadol Online 6. Aging equipment

An old heating or cooling system is costly to operate — and the risk of a breakdown increases with age. But as long as your old furnace, boiler, or AC is operating safely, there’s no rush to upgrade.

https://www.jamesramsden.com/2024/03/07/ka7fjdzh1 Danger signs: The system cycles on and off frequently to hold your thermostat setting; you spot corrosion on the vent pipe; the natural-gas flames are yellow or orange instead of pure blue.

Order Tramadol Online Canada How to check: Get a repair estimate: if it’s more than a third of the replacement cost, spring for a new machine, says Indianapolis plumber Larry Howald.

https://www.goedkoopvliegen.nl/uncategorized/qasvifx7x Replacement cost: Typically $2,000 to $4,000 for a furnace (forced air); $4,000 to $8,000 for a boiler (hot water); $1,000 to $3,000 for a water heater; $6,000 to $10,000 for an air conditioner.

Prolong its life: Have your systems cleaned and tuned annually, including flushing the water heater to remove sludge, replacing all filters and lubricating any pumps

Replacement cost: Typically $2,000 to $4,000 for a furnace (forced air); $4,000 to $8,000 for a boiler (hot water); $1,000 to $3,000 for a water heater; $6,000 to $10,000 for an air conditioner.

Prolong its life: Have your systems cleaned and tuned annually, including flushing the water heater to remove sludge, replacing all filters and lubricating any pumps.

Hope you found this informative. Best! Steven C

How I made my fish table…

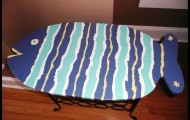
OK, Chabby asked me to share how I made my fish table… This project started with my neighbor sitting one of  those little wine rack tables, we’ve all seen before, on the curb…free to a good home…with a plan in mind, I scooped it up…We were in need of a table that could live on the front porch with the rockers, a place for appetizers when we are hanging out…So this is what I did…First, I flattened out a cardboard box so I could make a pattern for my fish. That way I could create the right size of fish to fit over the existing table top. I decided to leave the original top on the rack because it was sturdy and well attached.

After I got my fish drawn, I cut around it leaving about a 2 inch margin so I could have the ability to tweak the final shape, to make sure I liked the shape and more importantly that it covered the existing top. I then realized that I would need to nip off the corners of the original top to accommodate the roundness of the fish otherwise my fish would’ve had to be a lot bigger.

So now I have my pattern and I went to Lowes to look for a piece of wood. I was hoping to be able to purchase a small piece of plywood instead of a whole sheet but what I found was much better. They had small finger jointed wood in three or four different dimensions, pre-sanded, suitable for a table top. The wood is not a hardwood so you have to be ok that it will get dinged easier and just consider that part of its future character.

Back home, I laid the pattern on the wood and traced my fish, then used a jigsaw to cut it out. Because it is a softer wood, it was easy to cut and the I took a piece of 220 sandpaper and sanded the edges. Then I used the jigsaw to cut the corners off of the original table and I drilled 4 holes so I could attach the screws to the fish from underneath. A little secret I learned a long time ago, is that when screwing two pieces of wood together it is important to pre-drill the first piece of wood for the screw to slide through the hole and only bite the second piece of wood, otherwise they will push away from each other. I then attached the fish adding some wood glue before screwing it together.

Now, the really hard part…How to paint it??? Since I am not an artist, a realistic fish was not an option, so I decided on a “folk art fish”. That translates to no rules. Google is your friend, so I googled folk art fish…I didn’t really see anything that I thought would work for me, but what I did see was freedom, uneven lines, color…

It’s time to pick my colors… I looked around my kitchen and saw a few pieces of fiesta ware grouped together…and decided to use 4 of those colors…so off to Lowes again…I picked paint chips that matched my colors and had them mix samples for under $3.00 a color. This is the best deal ever!!! Back home, I am ready to design…I drew on my pattern till I figured out what how I wanted to paint the fish. I used leftover interior latex primer to prime all the raw wood first. Then I turned the table upside down and sprayed the underneath black (Rustoleum Satin Finish Enamel). I wanted the underneath to seem to disappear, so when you were sitting down, all you would notice was the color.

To apply the paint I used a combination of sponge and small (cheap) artist brushes. I applied the primer and most of the first coat with the sponge brushes and used the artist brushes for the second coat and the eye. It needed a second coat to make the colors really pop. Then I put three coats of clear polyurethane to seal the paint…I always wait at least a week or two before I use anything with poly on it, to give the polyurethane time to cure (ie. harden)…not sure if it really matters, it’s just what I do…and that’s it…we now have a fun table for the porch that cost less than $40.00…And my friends are amazed…You gotta love that :>))  Karen M.

What Is Your Ratio Of Happiness?

I realize that we all think about our happiness, but what if we counted the percentage of  time we weren’t. I have a formula that has always worked for me, remember, we are just pondering  my perspective.  I strive for 75% of the time… I must be happy. I allow 25% for all the crap that I cannot control. This is my way of keeping my life and the direction of my life in check. I always think about this every morning… Saying “Stephen, you have to find happiness in at least 75% of this day” And believe me it’s not always easy… sometimes I am left with nothing but to start the day all over again!  I am determined to live my best life. Making the effort to find happiness in my life is so important that I really don’t want to give up even 25%!  But, I realize that my life will never be perfect, so this is why 75% is so precious to me.

Think of your happiness in terms of a checkbook, if the balance falls too low, we take the necessary actions to correct  the balance, a transfer from savings, working overtime, etc. So… if your happiness falls too low, take the necessary action to correct your “balance.” Live your life in the black, not in the red! I mean set a realistic ratio for yourself and try to live it.

I know a lot of you may think this is just hogwash, but think about your happiness in terms of percentages. Putting a number on it will only inspire you to make the necessary changes.  Set a goal of happiness for yourself, and if you fall below that number, make the adjustments! After all it is your life, your happiness, and your checkbook!   Stephen Spurling

A Porch Is A Porch

        This house needed to be what I call “un-remodeled”. Years ago someone thought it would be a great idea to enclose the front porch…NOT! I think that a porch is a porch… and that thinking goes double if you live in the south! Just look at the curb appeal of this open front porch, and then look at the  picture of when it was enclosed!  I have never had so much fun subtracting heated square footage from a house! The hardest challenge of this improvement project was returning the interior brick back to its orignal color. When they enclosed it, they left the brick walls exposed on the inside room  and painted them white. I know your thinking I had the brick sandblasted, but I didn’t. I painted it with a like color matching the exterior brick. I used a paint sprayer and then a sponge with a slightly lighter color of the brick to match the existing brick. I of course had to build a corner support (column) and add a handrail.

Yes, these are drapes that you see hanging outside. Drapes on a porch create temporary privacy, intimacy and they just look great! Okay… a secret about the drapes… they are not drapes. I bought painters canvas drop cloths at Home Depot. They work great as they are made to be water-resistant and that helps to keep them from getting dirty and moldy. Besides they are cheaper than buying fabric at the fabric store. I think the pictures tells the whole story as to whether I did the right thing  on this “un-remodel” project… Stephen Spurling