March 19, 2024

Lighting for deck stairs

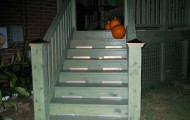
I have come up with an easy and inexpensive way to light up your deck stairs. First you must have what are called risers, ( boards that run between each step, used to close up the area under each step. I cut out a 1 inch  high by 12 inch width rectangle of the riser (bottom side closest to the step). The best part is that I envisioned a frosted plexiglass cover for each cut out . However, plexiglass seemed way to labor intensive and costly, so I thought what material would give me the same look? I was at Home Depot and thought plastic, clear plastic which isn’t clear, has a frosted look. I headed to the paint department to find a roll of plastic. I cut the plastic into squares and stapled  the plastic squares to the back the stair risers. I use a single light under the stairs that is on a timer.  Look at the pictures as they explain and show the results. Forget the plexiglass and use the inexpensive plastic to create lighting for the stairs. This project shows how to substitute materials and save money doing it!

This idea could also be used on a handicap ramp!


A Unique Entry Gate To Your Garden.

I have always said the entry to your home is most important for a grand “first impression”. I also believe the entry into your gardens should hold the same importance. I wanted to share the garden entry that I built with a little creative energy and little money, and what a garden entry! I used treated lumber to build the frames, and it is a must if it is going to last for years to come. What I consider is my creative energy was when I saw this wrought iron fence panel at Home Depot …. The faux wrought iron fence panel was made out of aluminum.  At this point I realized it would be easy to cut even with a hacksaw. When I got home,  I began the project. I cut my treated lumber to the sizes that I wanted height and width wise, and then I put them together with metal brackets for extra strength. I wanted double doors, and keep in mind when creating your entry it must be scaled so that it is easy to access your yard with your mower, and lawn equipment. The vision for the wrought iron fence panel would become windows for the doors. Check out the picture to my final vision… Sometimes just the simplest resources at your home improvement store can be modified into something really special.


Deck+Stain=COLOR!

I know. Everyone dreads having to stain or restain their decks.  We recently had to tackle this project while creating a new outdoor living space for ourselves.  I don’t know about you, but we have tired of the myriad of browns that are available.

Upon searching for a stain for our deck project, we were happy to find color as an option.  The  green we chose set up a beautiful green blue hue that created quite a wow factor in the yard, and harmonized beautifully with nature. It also gave us the opportunity to use the color for accent pieces on our outdoor furniture, and inspired some beautiful container gardens.

So, next time you have to stain a dreary deck, think color!


Hot Staging Trends in 2013

The clutter is cleared. The house is clean. Now, what accessories and accents can you use to make a room look fresh and modern? Try chunky woven blankets, reflective surfaces and tangerine combined with neutral shades.

Other Ideas:

Mother Earth Inspired Elements. Nature is popular this year. popular color palettes are reminiscent of natural elements-reds found in earth and soli, blues of the sea, lush greens of the rain forest, and neutrals that draw from the softer, textured look of eggs, seashells, and sand. the natural tones are being paired with color accents, such as Tangerine. Also look for accessories that incorporate natural elements such as woven baskets, leather stools and cotton towels.

Fabulous Faux. Think zebra stripe rugs or leopard print votives. But beware: use animal prints in small doses only.

Digital Fabrics. Framing a piece of digital fabric is a great way to create an inexpensive piece of artwork. Try textiles with fern or tree branch patterns.

Not your grandmothers Doilies. Add lace in subtle ways-on top of tablecloths or paired with bold colors. Traditional quilts and crochet peices are also popular.

Faded Area Rugs? Vintage is in Vogue! Instead of ditching that old Asian rug, use it as the foundation for your rooms color and aesthetic palette. Add modern artwork and accessories that compliment vintage pieces.

Opposites Attract: Think silk with suede, furniture with studs, “shiny with vintage”.

Touch the Sky: Think about clouds and water when choosing reflective white, blue and silver objects and hardware. Mirrors are great for staging as they make the room look much larger. Also consider mirrors in other ways, such as for a tray holding a tea-cup and saucer or on a wall in an area where there isn’t a lot of light.

Bottom Line: Have fun and let your creativity shine.

Chabby. Southern Smarts

Photo courtesy of Elle Décor.


A Simple Painting Tip for Your Plaster Walls

As many of you know  we at Southern Smarts love our renovating projects. We also love old  houses, and bringing them back to life is a passion for us. There is a simple DIY  painting tip when painting plaster walls in an older home that can hide a multitude of sins where settlement issues become apparent.

The simple answer is a good quality of “Flat” finish paint. When using a semi gloss, high gloss or eggshell on old plaster you will find any blemishes are highlighted and become extremely visible. A flat finish paint definitely camouflages the imperfections on the surface of the walls.

Now we know the best way to take care of this would be to “Skim Coat” the walls and sand. But hiring professionals to do this can be expensive. If you are looking for a quick fix that is extremely economical, it is as simple as the finish of the paint you plan to use.

Hope you find this quick tip helpful and thanks for visiting us here at Southern Smarts!


New Life for Old Lamps.


Lately I have had lamps on my brain. Big ones, small ones and everything in between. In addition to the utilitarian reasons we use lamps, I have found they do have personalities all their own, and can make a statement in any room. One afternoon as we were cleaning out my mothers attic after her passing, I came across this old pair of Ethan Allen lamps from the 60’s. They were solid wood with a dark stain and I remembered seeing them  in our living room as a child. They certainly were very fashionable for the time, but now needed some serious revamping.

Those of you that have followed us here at SouthernSmarts.com you all know I do enjoy designing with color.  For inspiration on this project I used the sea. I love the beach, and thought they would make some interesting table lamps for a smart beach place. Always budget conscious I was going to have to create something with minimal cost.

First, I sanded them with a fine grade sandpaper so they would hold a good primer. I used a spray primer applying very light coats until they were completely covered. The faux brass base and top had to go. I used a high gloss off white paint applied with a small brush, while being careful not to leave brush marks. It was now time for color, and after much thought I decided to use a wonderful turquoise semigloss interior paint that I happened to have in the garage. I did not want a heavy painted finish, as there are some wonderful markings on the lamps themselves, so I decided on a Turquoise wash. I used a little paint and thinned it with water and applied the color with a small rag, carefully controlling how much paint went on at a time. Upon reaching the desired effect I was through.

The next step was a bit difficult. I had to find the perfect shades. I looked everywhere, and finally on my last stop at my local Target, I found them. The shades remind me of the horizon as you look out over the ocean, and they could not have been more perfect.  They were 14.99 a piece, and my wallet was happy.

The final touch were these little beads I had found at a cool shop in Southport and have  crystal droplets that turn them on and off by pull chain.

I now have a really cool pair of lamps that I can’t wait to take to beach.  And the fact that they were my moms makes them that much more special. I feel like I have a part of her there, and I  can’t put a price on that.

Cheers! Chabby


Finding the Joy in the Journey.

When life suddenly scaled things down with the subtlety of an F5, I had to regroup on most things. Gone were the days of chartered boating, upscale resorts, and divine city dining. This lifestyle change may have adjusted my itinerary, but it has not changed my wanderlust, and curiosity for what may be around the next bend. Therefore, In my travels, I have reached out, and made incredible journeys into my own.

Locally, I have discovered an ethereal coastal compound for wild horses, that have inhabited this extraordinary island for hundreds of years. I happened on a bird sanctuary, that rehabilitates birds of prey, and fosters and guards its local eco system. I have toured  historic buildings to better understand my local history. I have happened on locally grown treats at state highway roadside markets, that make it more than worth the diversion. I have found characters in small, rural towns, that have turned their passions into content for national documentaries.  I have enjoyed views from day hikes that can be postcard perfect, and sunset kayak excursions on local rivers, that would be worth a much longer trip.

I am grateful for the five star resorts, and the first class seats, and all the luxury of a different time. But for now, I am tuned into a fresher, deeper, and more mature adventure. I am enjoying rich and simple discoveries in my own backyard. “The Joy of the Journey”

Andi Bartruff

Contributing Writer/Southern Smarts


Southern


5 Low Cost Kitchen Redos.

The kitchen is the focal point in many homes. And it’s one of the features, should you decide to ever sell, that potential buyers compare most closely when they are shopping for a home. Here are cost estimates for some low-cost kitchen upgrades that can give you a  real “POP” without breaking the bank.

1. Hardware

replacing cabinet hardware such as handles, knobs, and hinges is a quick, DIY way to enhance kitchen space. According to houselogic.com, an average kitchen is 200 sq feet with 30 linear feet of cabinetry,which equates to about 40 handles and knobs. averaging between $2.00 and $20.00 per knob or pull, a homeowner can expect to spend between $80.00 to $800.00 for this enhancement.

2. Faucet

There are a myriad options today in terms of height, spouts, pullout hoses and folding necks, with quality faucets starting at around $200.00.

3. Lighting

Adding an LED under-cabinet light can have a dramatic effect for around $40.00

4. Organization

Practical storage in the kitchen will go a long way. Over the door hooks, baskets in the Pantry, drawer organizers, wall hooks for pots and pans and stackable shelves for cabinets will add appeal, typically for less thank $100.00. Make your kitchen appear cook friendly.

5. Countertops

Laminate can mimic the contemporary look of granite at a significant discount. The cost for the average kitchen with 30 linear feet of laminate countertops is roughly $1575; the same space in granite would be about $2400.00

Lean times call for a budget when it comes to Home Maintenance!

I am always on the hunt for articles and additional information to provide our readers that they may find helpful. This article from Money Magazine jumped off the page and I sure hope you all find it both helpful and informative.

(MONEY Magazine) — Lean times call for budgetary triage. But while you should clearly opt for orthodontics before Disneyland, the choice is tougher when it comes to home maintenance.

Should you get a paint job or a new furnace? “There’s no homeowner’s manual that tells you when to do what,” says Naperville, Ill., home inspector and structural engineer Mark Waldman

Emergencies aside, the project that could cause the most damage and expense if left unfixed is the priority. Below, the order in which to tackle your biggest repair needs.

1. Electrical system

Wiring problems claim the No. 1 spot for good reason: They can lead to fires and electrocution. “That trumps everything,” says Waldman.

Danger signs: Circuit breakers that trip frequently, lights that dim when you turn on the vacuum or outlets that are loose, hot, or accept only two-prong plugs.

How to check: Spend $300 to $500 for a licensed electrician to open up your main panel to look for trouble and to tighten any loose connections. He’ll also spot-check switches, outlets and light fixtures to ensure that the wiring is in safe working order

Replacement cost: $4,000 to $10,000 to rewire the house.

Prolong its life: Flip every circuit breaker off and on again once a year to prevent corrosion. Add new circuits ($100 to $500 each) to take the heaviest electrical loads, like window air conditioners, off the old wires.

2. Basement

Structural problems downstairs mean shifting and cracking upstairs — at the very least — so there’s little point in doing other repairs until you’ve fixed the building’s foundation.

Danger signs: Bowed or split beams, rotted posts, piles of sawdust (evidence of wood-boring insects), tiny mud trails (indications of termites), or large cracks in the masonry foundation — especially if the cracks are horizontal, which tends to indicate a bigger problem.

How to check: A contractor will usually take a look free of charge. If he recommends significant repairs, hire a home inspection engineer (find one at nabie.org) to investigate ($350 to $500).

Replacement cost: Major foundation work can cost $3,500 to $8,000; new posts or beams could run $1,200 to $2,500.

Prolong its life: Water is the cause of cracked concrete, rotten timbers and wood-eating pests. So keep your basement dry by making sure the landscape slopes away from the house and maintaining the next two items on the list: the roof and gutters.

3. Roof

Water leaking into your home from above can lead to a host of pricey problems: rot, insects, electrical shorts and mold.

Danger signs: Dampness or stains on ceilings; curling, missing, or broken shingles; smooth spots where the granules have worn away; green algae growth.

How to check: Have a roofer inspect your home. This is typically free, but the pro, of course, is looking for business. So check the company’s reputation at angieslist.com ($5 a month).

Replacement cost: $5,000 to $15,000

Prolong its life: Prune tree limbs so they’re at least 10 feet from the roof to keep squirrels away and to let moisture evaporate quickly after storms. If shingles blow off, replace them immediately, and repair small leaks promptly.

4. Gutters

Your gutters are just as important as the roof. The only reason they’re lower on this list is that if you replace gutters first, they’re likely to get damaged when you reroof later. So if you need a roof too, it’s better to wait — or do both projects at the same time.

Danger signs: Dented or disconnected gutters, pooled water around your home’s foundation, or basement flooding near the downspouts.

How to check: Head outside during a rainstorm and watch the gutters in action, says Caitlin Corkins, stewardship manager for Historic New England, which maintains dozens of historic properties. “The best time to see clogs and overflows is when the system is working,” she says.

Replacement cost: $1,500 to $3,000

Prolong its life: Hire a gutter company to clean, check, and repair your gutters ($100 to $200) at least once a year — two or three times if you’re in a wooded area. And have someone clear the eaves of deep snow to prevent icing, which can split open gutters or rip them right off the house.

5. Exterior walls

“People think paint is just a decorative element, so they let it go,” says Robert Niemeyer, a Winston-Salem, N.C., handyman, contractor, and electrician. But without a weather-tight seal, water can infiltrate the siding, causing rot.

and attracting wood-damaging insects. Still, leaks from a vertical surface generally aren’t as quick or lethal as ones from a roof and gutter.

Danger signs: Paint that’s peeling, cracking or blistering

Replacement cost: $4,000 to $10,000; make sure the painters replace loose putty around the window glass and caulking gaps around molding

Prolong its life: Hire a pro to do touchups every year. Trim foliage so it’s at least a foot from the house, and kill any mildew growth with a bleach-and-water solution.

6. Aging equipment

An old heating or cooling system is costly to operate — and the risk of a breakdown increases with age. But as long as your old furnace, boiler, or AC is operating safely, there’s no rush to upgrade.

Danger signs: The system cycles on and off frequently to hold your thermostat setting; you spot corrosion on the vent pipe; the natural-gas flames are yellow or orange instead of pure blue.

How to check: Get a repair estimate: if it’s more than a third of the replacement cost, spring for a new machine, says Indianapolis plumber Larry Howald.

Replacement cost: Typically $2,000 to $4,000 for a furnace (forced air); $4,000 to $8,000 for a boiler (hot water); $1,000 to $3,000 for a water heater; $6,000 to $10,000 for an air conditioner.

Prolong its life: Have your systems cleaned and tuned annually, including flushing the water heater to remove sludge, replacing all filters and lubricating any pumps

Replacement cost: Typically $2,000 to $4,000 for a furnace (forced air); $4,000 to $8,000 for a boiler (hot water); $1,000 to $3,000 for a water heater; $6,000 to $10,000 for an air conditioner.

Prolong its life: Have your systems cleaned and tuned annually, including flushing the water heater to remove sludge, replacing all filters and lubricating any pumps.

Hope you found this informative. Best! Steven C

How I made my fish table…

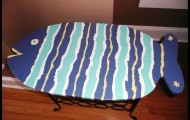
OK, Chabby asked me to share how I made my fish table… This project started with my neighbor sitting one of  those little wine rack tables, we’ve all seen before, on the curb…free to a good home…with a plan in mind, I scooped it up…We were in need of a table that could live on the front porch with the rockers, a place for appetizers when we are hanging out…So this is what I did…First, I flattened out a cardboard box so I could make a pattern for my fish. That way I could create the right size of fish to fit over the existing table top. I decided to leave the original top on the rack because it was sturdy and well attached.

After I got my fish drawn, I cut around it leaving about a 2 inch margin so I could have the ability to tweak the final shape, to make sure I liked the shape and more importantly that it covered the existing top. I then realized that I would need to nip off the corners of the original top to accommodate the roundness of the fish otherwise my fish would’ve had to be a lot bigger.

So now I have my pattern and I went to Lowes to look for a piece of wood. I was hoping to be able to purchase a small piece of plywood instead of a whole sheet but what I found was much better. They had small finger jointed wood in three or four different dimensions, pre-sanded, suitable for a table top. The wood is not a hardwood so you have to be ok that it will get dinged easier and just consider that part of its future character.

Back home, I laid the pattern on the wood and traced my fish, then used a jigsaw to cut it out. Because it is a softer wood, it was easy to cut and the I took a piece of 220 sandpaper and sanded the edges. Then I used the jigsaw to cut the corners off of the original table and I drilled 4 holes so I could attach the screws to the fish from underneath. A little secret I learned a long time ago, is that when screwing two pieces of wood together it is important to pre-drill the first piece of wood for the screw to slide through the hole and only bite the second piece of wood, otherwise they will push away from each other. I then attached the fish adding some wood glue before screwing it together.

Now, the really hard part…How to paint it??? Since I am not an artist, a realistic fish was not an option, so I decided on a “folk art fish”. That translates to no rules. Google is your friend, so I googled folk art fish…I didn’t really see anything that I thought would work for me, but what I did see was freedom, uneven lines, color…

It’s time to pick my colors… I looked around my kitchen and saw a few pieces of fiesta ware grouped together…and decided to use 4 of those colors…so off to Lowes again…I picked paint chips that matched my colors and had them mix samples for under $3.00 a color. This is the best deal ever!!! Back home, I am ready to design…I drew on my pattern till I figured out what how I wanted to paint the fish. I used leftover interior latex primer to prime all the raw wood first. Then I turned the table upside down and sprayed the underneath black (Rustoleum Satin Finish Enamel). I wanted the underneath to seem to disappear, so when you were sitting down, all you would notice was the color.

To apply the paint I used a combination of sponge and small (cheap) artist brushes. I applied the primer and most of the first coat with the sponge brushes and used the artist brushes for the second coat and the eye. It needed a second coat to make the colors really pop. Then I put three coats of clear polyurethane to seal the paint…I always wait at least a week or two before I use anything with poly on it, to give the polyurethane time to cure (ie. harden)…not sure if it really matters, it’s just what I do…and that’s it…we now have a fun table for the porch that cost less than $40.00…And my friends are amazed…You gotta love that :>))  Karen M.