March 19, 2024

Hot Staging Trends in 2013

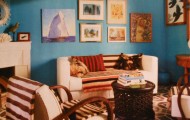
The clutter is cleared. The house is clean. Now, what accessories and accents can you use to make a room look fresh and modern? Try chunky woven blankets, reflective surfaces and tangerine combined with neutral shades.

Other Ideas:

Mother Earth Inspired Elements. Nature is popular this year. popular color palettes are reminiscent of natural elements-reds found in earth and soli, blues of the sea, lush greens of the rain forest, and neutrals that draw from the softer, textured look of eggs, seashells, and sand. the natural tones are being paired with color accents, such as Tangerine. Also look for accessories that incorporate natural elements such as woven baskets, leather stools and cotton towels.

Fabulous Faux. Think zebra stripe rugs or leopard print votives. But beware: use animal prints in small doses only.

Digital Fabrics. Framing a piece of digital fabric is a great way to create an inexpensive piece of artwork. Try textiles with fern or tree branch patterns.

Not your grandmothers Doilies. Add lace in subtle ways-on top of tablecloths or paired with bold colors. Traditional quilts and crochet peices are also popular.

Faded Area Rugs? Vintage is in Vogue! Instead of ditching that old Asian rug, use it as the foundation for your rooms color and aesthetic palette. Add modern artwork and accessories that compliment vintage pieces.

Opposites Attract: Think silk with suede, furniture with studs, “shiny with vintage”.

Touch the Sky: Think about clouds and water when choosing reflective white, blue and silver objects and hardware. Mirrors are great for staging as they make the room look much larger. Also consider mirrors in other ways, such as for a tray holding a tea-cup and saucer or on a wall in an area where there isn’t a lot of light.

Bottom Line: Have fun and let your creativity shine.

Chabby. Southern Smarts

Photo courtesy of Elle Décor.


New Life for Old Lamps.


Lately I have had lamps on my brain. Big ones, small ones and everything in between. In addition to the utilitarian reasons we use lamps, I have found they do have personalities all their own, and can make a statement in any room. One afternoon as we were cleaning out my mothers attic after her passing, I came across this old pair of Ethan Allen lamps from the 60’s. They were solid wood with a dark stain and I remembered seeing them  in our living room as a child. They certainly were very fashionable for the time, but now needed some serious revamping.

Those of you that have followed us here at SouthernSmarts.com you all know I do enjoy designing with color.  For inspiration on this project I used the sea. I love the beach, and thought they would make some interesting table lamps for a smart beach place. Always budget conscious I was going to have to create something with minimal cost.

First, I sanded them with a fine grade sandpaper so they would hold a good primer. I used a spray primer applying very light coats until they were completely covered. The faux brass base and top had to go. I used a high gloss off white paint applied with a small brush, while being careful not to leave brush marks. It was now time for color, and after much thought I decided to use a wonderful turquoise semigloss interior paint that I happened to have in the garage. I did not want a heavy painted finish, as there are some wonderful markings on the lamps themselves, so I decided on a Turquoise wash. I used a little paint and thinned it with water and applied the color with a small rag, carefully controlling how much paint went on at a time. Upon reaching the desired effect I was through.

The next step was a bit difficult. I had to find the perfect shades. I looked everywhere, and finally on my last stop at my local Target, I found them. The shades remind me of the horizon as you look out over the ocean, and they could not have been more perfect.  They were 14.99 a piece, and my wallet was happy.

The final touch were these little beads I had found at a cool shop in Southport and have  crystal droplets that turn them on and off by pull chain.

I now have a really cool pair of lamps that I can’t wait to take to beach.  And the fact that they were my moms makes them that much more special. I feel like I have a part of her there, and I  can’t put a price on that.

Cheers! Chabby


How I made my fish table…

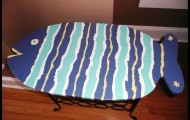
OK, Chabby asked me to share how I made my fish table… This project started with my neighbor sitting one of  those little wine rack tables, we’ve all seen before, on the curb…free to a good home…with a plan in mind, I scooped it up…We were in need of a table that could live on the front porch with the rockers, a place for appetizers when we are hanging out…So this is what I did…First, I flattened out a cardboard box so I could make a pattern for my fish. That way I could create the right size of fish to fit over the existing table top. I decided to leave the original top on the rack because it was sturdy and well attached.

After I got my fish drawn, I cut around it leaving about a 2 inch margin so I could have the ability to tweak the final shape, to make sure I liked the shape and more importantly that it covered the existing top. I then realized that I would need to nip off the corners of the original top to accommodate the roundness of the fish otherwise my fish would’ve had to be a lot bigger.

So now I have my pattern and I went to Lowes to look for a piece of wood. I was hoping to be able to purchase a small piece of plywood instead of a whole sheet but what I found was much better. They had small finger jointed wood in three or four different dimensions, pre-sanded, suitable for a table top. The wood is not a hardwood so you have to be ok that it will get dinged easier and just consider that part of its future character.

Back home, I laid the pattern on the wood and traced my fish, then used a jigsaw to cut it out. Because it is a softer wood, it was easy to cut and the I took a piece of 220 sandpaper and sanded the edges. Then I used the jigsaw to cut the corners off of the original table and I drilled 4 holes so I could attach the screws to the fish from underneath. A little secret I learned a long time ago, is that when screwing two pieces of wood together it is important to pre-drill the first piece of wood for the screw to slide through the hole and only bite the second piece of wood, otherwise they will push away from each other. I then attached the fish adding some wood glue before screwing it together.

Now, the really hard part…How to paint it??? Since I am not an artist, a realistic fish was not an option, so I decided on a “folk art fish”. That translates to no rules. Google is your friend, so I googled folk art fish…I didn’t really see anything that I thought would work for me, but what I did see was freedom, uneven lines, color…

It’s time to pick my colors… I looked around my kitchen and saw a few pieces of fiesta ware grouped together…and decided to use 4 of those colors…so off to Lowes again…I picked paint chips that matched my colors and had them mix samples for under $3.00 a color. This is the best deal ever!!! Back home, I am ready to design…I drew on my pattern till I figured out what how I wanted to paint the fish. I used leftover interior latex primer to prime all the raw wood first. Then I turned the table upside down and sprayed the underneath black (Rustoleum Satin Finish Enamel). I wanted the underneath to seem to disappear, so when you were sitting down, all you would notice was the color.

To apply the paint I used a combination of sponge and small (cheap) artist brushes. I applied the primer and most of the first coat with the sponge brushes and used the artist brushes for the second coat and the eye. It needed a second coat to make the colors really pop. Then I put three coats of clear polyurethane to seal the paint…I always wait at least a week or two before I use anything with poly on it, to give the polyurethane time to cure (ie. harden)…not sure if it really matters, it’s just what I do…and that’s it…we now have a fun table for the porch that cost less than $40.00…And my friends are amazed…You gotta love that :>))  Karen M.

What Is Your Ratio Of Happiness?

I realize that we all think about our happiness, but what if we counted the percentage of  time we weren’t. I have a formula that has always worked for me, remember, we are just pondering  my perspective.  I strive for 75% of the time… I must be happy. I allow 25% for all the crap that I cannot control. This is my way of keeping my life and the direction of my life in check. I always think about this every morning… Saying “Stephen, you have to find happiness in at least 75% of this day” And believe me it’s not always easy… sometimes I am left with nothing but to start the day all over again!  I am determined to live my best life. Making the effort to find happiness in my life is so important that I really don’t want to give up even 25%!  But, I realize that my life will never be perfect, so this is why 75% is so precious to me.

Think of your happiness in terms of a checkbook, if the balance falls too low, we take the necessary actions to correct  the balance, a transfer from savings, working overtime, etc. So… if your happiness falls too low, take the necessary action to correct your “balance.” Live your life in the black, not in the red! I mean set a realistic ratio for yourself and try to live it.

I know a lot of you may think this is just hogwash, but think about your happiness in terms of percentages. Putting a number on it will only inspire you to make the necessary changes.  Set a goal of happiness for yourself, and if you fall below that number, make the adjustments! After all it is your life, your happiness, and your checkbook!   Stephen Spurling

A Porch Is A Porch

        This house needed to be what I call “un-remodeled”. Years ago someone thought it would be a great idea to enclose the front porch…NOT! I think that a porch is a porch… and that thinking goes double if you live in the south! Just look at the curb appeal of this open front porch, and then look at the  picture of when it was enclosed!  I have never had so much fun subtracting heated square footage from a house! The hardest challenge of this improvement project was returning the interior brick back to its orignal color. When they enclosed it, they left the brick walls exposed on the inside room  and painted them white. I know your thinking I had the brick sandblasted, but I didn’t. I painted it with a like color matching the exterior brick. I used a paint sprayer and then a sponge with a slightly lighter color of the brick to match the existing brick. I of course had to build a corner support (column) and add a handrail.

Yes, these are drapes that you see hanging outside. Drapes on a porch create temporary privacy, intimacy and they just look great! Okay… a secret about the drapes… they are not drapes. I bought painters canvas drop cloths at Home Depot. They work great as they are made to be water-resistant and that helps to keep them from getting dirty and moldy. Besides they are cheaper than buying fabric at the fabric store. I think the pictures tells the whole story as to whether I did the right thing  on this “un-remodel” project… Stephen Spurling


Heart.

The heart has always been a symbol of love, courage, and devotion. Heart and Soul are two words often found together,

and for good reason. It is through the heart that the soul expresses itself. The heart is the organ that keeps us alive

physically, and it is the central source of our emotions and feelings. We know when someone is speaking from the heart, and

we know when our hearts have been touched. It has nothing to do with logic or being rational; knowing is a feeling. When we say

that someones heart is in the right place we know that regardless of the outward appearance of that person’s life, his or her intent

is soul felt and honest.

How is your heart feeling? Is it sad, happy, light or burdened? Is your heart in the right place? To know what is in our hearts

takes effort and time, for we must practice listening to the voice within. Don’t go to sleep at night with a sad heart; take time

to lighten your heart with the universe. Open your heart to the universe each night before you go to sleep, and it will bring joy

to your soul and wings to your ideas.

My Heart is happy, light and full of love.

Angel Wisdom. Chabby Chaberek

“Moods”

“Our moods are like the wind-one minute blowing fiercely, the next breathing gently, but always moving on”.

Our moods can be one of our greatest resources, for they reveal to us the many interesting facets of our personalities. Thanks to our moods, we are spared the embarrassment of being totally boring and predictable. We may even surprise ourselves by the various shades and colors our emotions acquire in response to different stimuli. The universe encourages us to work with our moods while at the same time detaching from them. Because they are a powerful form of energy, our moods can fuel our creativity. But we must not become their victims, for they are ultimately only passing phases of our personalities, not enduring aspects of our essential natures .

“I allow my emotions to teach me about myself without engulfing myself in them

Angel Wisdom

Chabby Chaberek


” It is what it is”

So many of us have grown to dislike this sometimes over used saying “it is what it is”, but I choose to look at the “saying” as a way of letting go. Letting go of a situation that is out of our control. This is not a bad thing, it’s not as if we don’t care anymore, but it becomes a way for us to move on. Dewelling on something that “is what it is” will only paralyze us physically and mentally, so much so, that we will be no  good to the situations we can control.It does feel so much better to live in the state of being productive with our problems, so recognize what we can and cannot change, then we may say “it is what it is” and most importantly…  move on with our life’s. Stephen Spurling