 OK, Chabby asked me to share how I made my fish table… This project started with my neighbor sitting one of those little wine rack tables, we’ve all seen before, on the curb…free to a good home…with a plan in mind, I scooped it up…We were in need of a table that could live on the front porch with the rockers, a place for appetizers when we are hanging out…So this is what I did…First, I flattened out a cardboard box so I could make a pattern for my fish. That way I could create the right size of fish to fit over the existing table top. I decided to leave the original top on the rack because it was sturdy and well attached.
After I got my fish drawn, I cut around it leaving about a 2 inch margin so I could have the ability to tweak the final shape, to make sure I liked the shape and more importantly that it covered the existing top. I then realized that I would need to nip off the corners of the original top to accommodate the roundness of the fish otherwise my fish would’ve had to be a lot bigger.
So now I have my pattern and I went to Lowes to look for a piece of wood. I was hoping to be able to purchase a small piece of plywood instead of a whole sheet but what I found was much better. They had small finger jointed wood in three or four different dimensions, pre-sanded, suitable for a table top. The wood is not a hardwood so you have to be ok that it will get dinged easier and just consider that part of its future character.
Back home, I laid the pattern on the wood and traced my fish, then used a jigsaw to cut it out. Because it is a softer wood, it was easy to cut and the I took a piece of 220 sandpaper and sanded the edges. Then I used the jigsaw to cut the corners off of the original table and I drilled 4 holes so I could attach the screws to the fish from underneath. A little secret I learned a long time ago, is that when screwing two pieces of wood together it is important to pre-drill the first piece of wood for the screw to slide through the hole and only bite the second piece of wood, otherwise they will push away from each other. I then attached the fish adding some wood glue before screwing it together.
Now, the really hard part…How to paint it??? Since I am not an artist, a realistic fish was not an option, so I decided on a “folk art fish”. That translates to no rules. Google is your friend, so I googled folk art fish…I didn’t really see anything that I thought would work for me, but what I did see was freedom, uneven lines, color…
It’s time to pick my colors… I looked around my kitchen and saw a few pieces of fiesta ware grouped together…and decided to use 4 of those colors…so off to Lowes again…I picked paint chips that matched my colors and had them mix samples for under $3.00 a color. This is the best deal ever!!! Back home, I am ready to design…I drew on my pattern till I figured out what how I wanted to paint the fish. I used leftover interior latex primer to prime all the raw wood first. Then I turned the table upside down and sprayed the underneath black (Rustoleum Satin Finish Enamel). I wanted the underneath to seem to disappear, so when you were sitting down, all you would notice was the color.
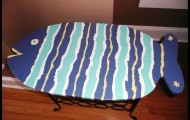
To apply the paint I used a combination of sponge and small (cheap) artist brushes. I applied the primer and most of the first coat with the sponge brushes and used the artist brushes for the second coat and the eye. It needed a second coat to make the colors really pop. Then I put three coats of clear polyurethane to seal the paint…I always wait at least a week or two before I use anything with poly on it, to give the polyurethane time to cure (ie. harden)…not sure if it really matters, it’s just what I do…and that’s it…we now have a fun table for the porch that cost less than $40.00…And my friends are amazed…You gotta love that :>)) Karen M.