December 7, 2024

Two Home Redos. The Gift that keeps on Giving.

Amid the hustle and bustle of everyday life, home has become a personal refuge.  We live in a crazy world and our home should be our sanctuary.

Disorganization takes away from the tranquility of our personal space. Here are two upgrades that are sure please and calm.

Separate Laundry Room:

A well-organized laundry space is the “gift that keeps on giving”. You can enhance laundry room space by installing shelving and cabinetry surrounding the washer and dryer. It does not have to be expensive; it’s the perfect DIY project. Consider what can be stored in that space: laundry detergent, other household cleaners, an iron and an ironing board, towels, bedding, and of course, dirty laundry.Add bins or baskets for instant clothes sorting. A big enhancement, if there is room, is the addition of a rolling table for folding laundry or doing arts and crafts projects.

Smart Storage:

For smart storage I recommend dedicated towers or cubes for each member of the family even one for pets. Add names to them and place them near a widely used entrance. They are great for creating a convenient system for sorting jackets, backpacks, mail, keys and leashes.
New Life for Old Lamps.


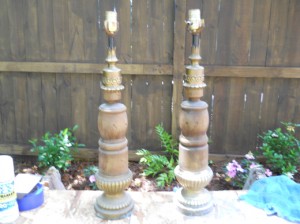
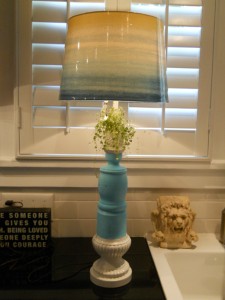
Lately I have had lamps on my brain. Big ones, small ones and everything in between. In addition to the utilitarian reasons we use lamps, I have found they do have personalities all their own, and can make a statement in any room. One afternoon as we were cleaning out my mothers attic after her passing, I came across this old pair of Ethan Allen lamps from the 60’s. They were solid wood with a dark stain and I remembered seeing them  in our living room as a child. They certainly were very fashionable for the time, but now needed some serious revamping.

Those of you that have followed us here at SouthernSmarts.com you all know I do enjoy designing with color.  For inspiration on this project I used the sea. I love the beach, and thought they would make some interesting table lamps for a smart beach place. Always budget conscious I was going to have to create something with minimal cost.

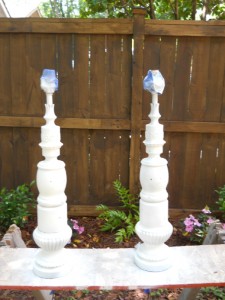
First, I sanded them with a fine grade sandpaper so they would hold a good primer. I used a spray primer applying very light coats until they were completely covered. The faux brass base and top had to go. I used a high gloss off white paint applied with a small brush, while being careful not to leave brush marks. It was now time for color, and after much thought I decided to use a wonderful turquoise semigloss interior paint that I happened to have in the garage. I did not want a heavy painted finish, as there are some wonderful markings on the lamps themselves, so I decided on a Turquoise wash. I used a little paint and thinned it with water and applied the color with a small rag, carefully controlling how much paint went on at a time. Upon reaching the desired effect I was through.

The next step was a bit difficult. I had to find the perfect shades. I looked everywhere, and finally on my last stop at my local Target, I found them. The shades remind me of the horizon as you look out over the ocean, and they could not have been more perfect.  They were 14.99 a piece, and my wallet was happy.

The final touch were these little beads I had found at a cool shop in Southport and have  crystal droplets that turn them on and off by pull chain.

I now have a really cool pair of lamps that I can’t wait to take to beach.  And the fact that they were my moms makes them that much more special. I feel like I have a part of her there, and I  can’t put a price on that.

Cheers! Chabby


From a Sows Ear to a Silk Purse. Oak Island Beach Cottage.

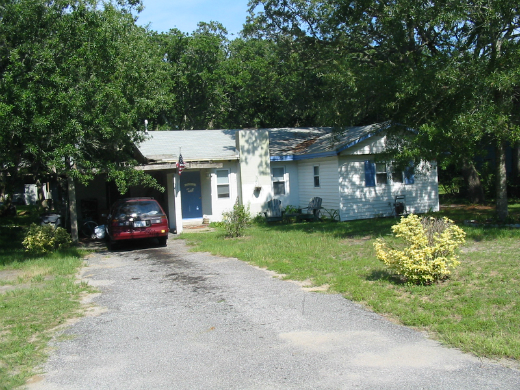
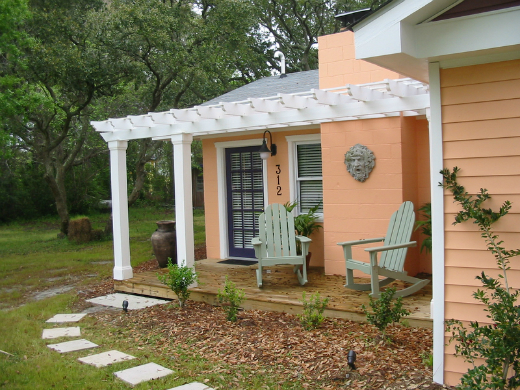
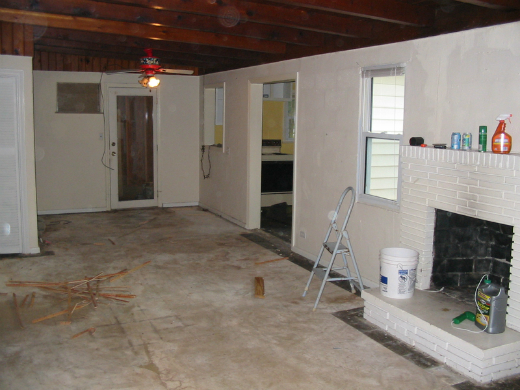
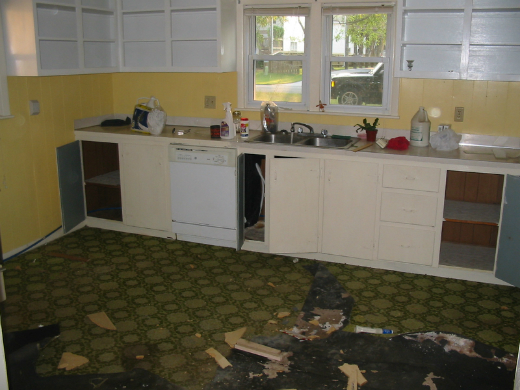
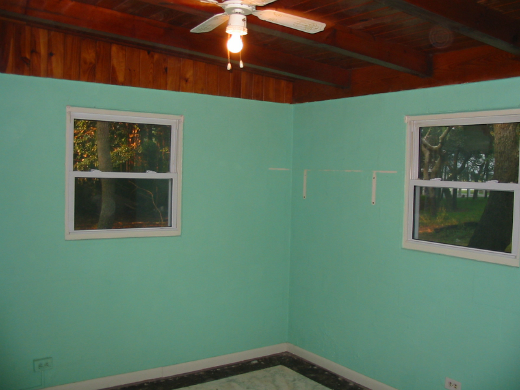
In 2004, I was on the hunt for a beach cottage. I did not want something that someone else had already renovated I wanted to put our own spin on it. The deals are out there, especially now with the real estate market being what it is today. Having a sweet summer, weekend, or retirement getaway is quite affordable if you are willing to put that old “sweat equity” into play. That’s exactly what we did. When I was looking there was not much on the market that I would term affordable. One weekend I was invited to a friend’s home on a quiet and quaint barrier island off the NC coast, Oak Island. My friends had purchased property there and really wanted us to do the same. While we were searching we came across this horrible little “shack” on a double lot on the beach side of the island. It came complete with a junkyard on one side of the lot and the house, well it looked like it was a tear down.It had to be one of the worst properties I had ever considered. Rotten siding, decrepit porch, built out of cinderblock, and the interior was a mess! When we say a mess, one cannot imagine that the smell of cat urine and the fleas jumping on our legs were the only stimulation that we got as we toured the place with our Realtor.

Through vision and flea bites we could see the good bones. The home had vaulted beamed wooden ceilings and a fireplace. The kitchen, which appeared to be an addition, was large in comparison to the rest of the cottage. There was a partially built side addition with a large window in the front. It had a large backyard full of the islands name sakes, live oaks.

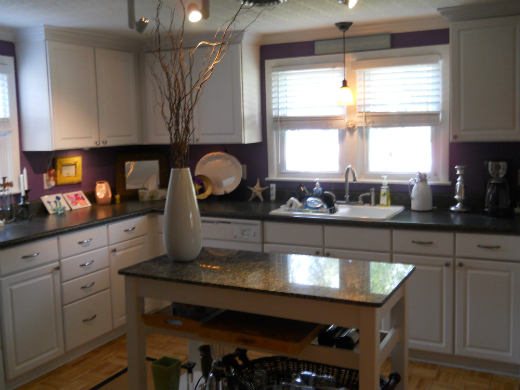
As you view the before and after photos you will be able to get the drift on how bad this little place was. The cottage is built predominantly with cinder block which is good from a possible hurricane perspective, but aesthetics on the interior with cinderblock walls was not going to work. To counteract this problem I decided to stucco all the interior walls. this was a daunting task, with potential for serious “carpel tunnel”.  I can tolerate  a little pain for fashion.

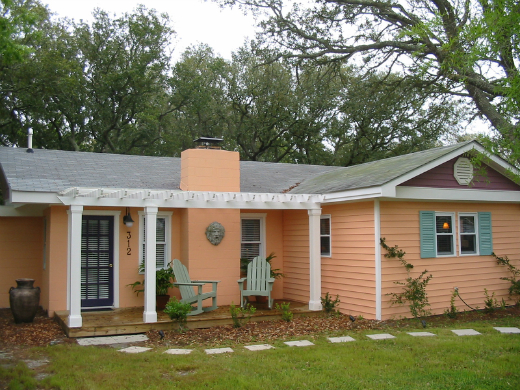
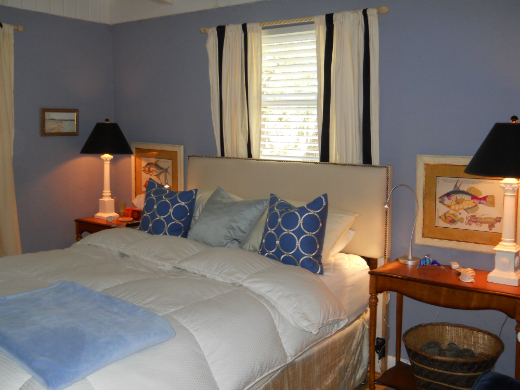
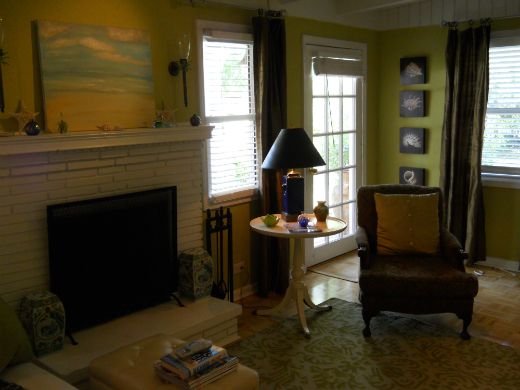
As budget was minimal we were going to do all the work ourselves, and had 90 days to bring it to completion. With this being a “fun house” I decided to let my imagination run wild where color was concerned. I selected a wonderful light green named ‘Independent Gold” with Sherwin Williams paint for the living, dining and small den. For the kitchen, I decided on a bright purple,  a periwinkle blue for the Master bedroom, and a bright gold for the guest room. With cement floors and a limited time frame, we decided on a glue down wood parquet for the floors as carpet was a non option with kids, sand etc. The small den had wood planks for flooring, and I painted them a bright white high gloss. For the exterior we were going to go with bright coral for the body of the house, purple for the peaks, and “Atlantic Green” for the shutters. We would  trim the house in white. We also added a deck on the right side and front, and built a covered front porch with decorative molding. The house felt dark, so we resolved this problem by using full French doors on the front and side entrances.  This enabled bright sunshine to enter the house, plus gave the house a real beach bungalow feel. For the interior, to keep the space feeling as open as possible, I opted to use full french doors for the bedrooms as well. For privacy I installed shades on the back of the doors so they may be closed for guest and family. This kept the interior bright and open.

Once all the construction work was complete, it was time to address furnishing the place. Now I am a flea market tag sale kind of guy. I knew I had some great old things in the basement, that with a  little updating and paint, would be fun, economical, and downright interesting. I wanted the place to have personality, be chic, welcoming and comfortable.

Upon arriving back in the city, I started my quest to get the house ready for my first week at the beach. I stopped by my local shops and found some very interesting fabric remnants.  I painted lamps and table,s and made three upholstered headboard which I covered with a plain off white canvas purchased at my local home improvement store. All I have to say is thank goodness for electric staple guns. They sure make the job a lot faster and with greater ease.

The end result is a great stylish little beach retreat that brings me more joy and relaxation than I could have ever imagined, and it cost a fraction of what I thought.  As a matter of fact. my beach neighbors loved what we had done so much, they asked us to consult as they prepared to redo their little cottage. We will be posting a story on that renovation in an upcoming article.

Remember style and comfort do not have to cost an arm and a leg. It just takes a little imagination. And if you find yourself cruising down Oak Island Blvd, feel free to stop by “Not The Hamptons ” and say hello. The iced tea with a hint of mint is always chilled. 🙂

Chabby 😉


5 Low Cost Kitchen Redos.

The kitchen is the focal point in many homes. And it’s one of the features, should you decide to ever sell, that potential buyers compare most closely when they are shopping for a home. Here are cost estimates for some low-cost kitchen upgrades that can give you a  real “POP” without breaking the bank.

1. Hardware

replacing cabinet hardware such as handles, knobs, and hinges is a quick, DIY way to enhance kitchen space. According to houselogic.com, an average kitchen is 200 sq feet with 30 linear feet of cabinetry,which equates to about 40 handles and knobs. averaging between $2.00 and $20.00 per knob or pull, a homeowner can expect to spend between $80.00 to $800.00 for this enhancement.

2. Faucet

There are a myriad options today in terms of height, spouts, pullout hoses and folding necks, with quality faucets starting at around $200.00.

3. Lighting

Adding an LED under-cabinet light can have a dramatic effect for around $40.00

4. Organization

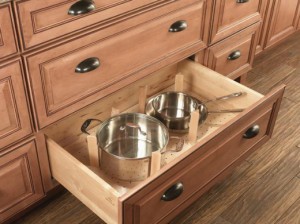
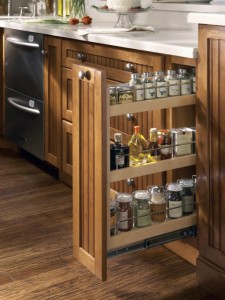
Practical storage in the kitchen will go a long way. Over the door hooks, baskets in the Pantry, drawer organizers, wall hooks for pots and pans and stackable shelves for cabinets will add appeal, typically for less thank $100.00. Make your kitchen appear cook friendly.

5. Countertops

Laminate can mimic the contemporary look of granite at a significant discount. The cost for the average kitchen with 30 linear feet of laminate countertops is roughly $1575; the same space in granite would be about $2400.00

How I made my fish table…

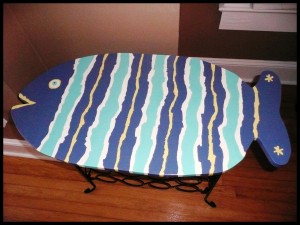
OK, Chabby asked me to share how I made my fish table… This project started with my neighbor sitting one of  those little wine rack tables, we’ve all seen before, on the curb…free to a good home…with a plan in mind, I scooped it up…We were in need of a table that could live on the front porch with the rockers, a place for appetizers when we are hanging out…So this is what I did…First, I flattened out a cardboard box so I could make a pattern for my fish. That way I could create the right size of fish to fit over the existing table top. I decided to leave the original top on the rack because it was sturdy and well attached.
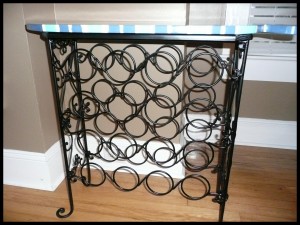
After I got my fish drawn, I cut around it leaving about a 2 inch margin so I could have the ability to tweak the final shape, to make sure I liked the shape and more importantly that it covered the existing top. I then realized that I would need to nip off the corners of the original top to accommodate the roundness of the fish otherwise my fish would’ve had to be a lot bigger.

So now I have my pattern and I went to Lowes to look for a piece of wood. I was hoping to be able to purchase a small piece of plywood instead of a whole sheet but what I found was much better. They had small finger jointed wood in three or four different dimensions, pre-sanded, suitable for a table top. The wood is not a hardwood so you have to be ok that it will get dinged easier and just consider that part of its future character.

Back home, I laid the pattern on the wood and traced my fish, then used a jigsaw to cut it out. Because it is a softer wood, it was easy to cut and the I took a piece of 220 sandpaper and sanded the edges. Then I used the jigsaw to cut the corners off of the original table and I drilled 4 holes so I could attach the screws to the fish from underneath. A little secret I learned a long time ago, is that when screwing two pieces of wood together it is important to pre-drill the first piece of wood for the screw to slide through the hole and only bite the second piece of wood, otherwise they will push away from each other. I then attached the fish adding some wood glue before screwing it together.

Now, the really hard part…How to paint it??? Since I am not an artist, a realistic fish was not an option, so I decided on a “folk art fish”. That translates to no rules. Google is your friend, so I googled folk art fish…I didn’t really see anything that I thought would work for me, but what I did see was freedom, uneven lines, color…

It’s time to pick my colors… I looked around my kitchen and saw a few pieces of fiesta ware grouped together…and decided to use 4 of those colors…so off to Lowes again…I picked paint chips that matched my colors and had them mix samples for under $3.00 a color. This is the best deal ever!!! Back home, I am ready to design…I drew on my pattern till I figured out what how I wanted to paint the fish. I used leftover interior latex primer to prime all the raw wood first. Then I turned the table upside down and sprayed the underneath black (Rustoleum Satin Finish Enamel). I wanted the underneath to seem to disappear, so when you were sitting down, all you would notice was the color.

To apply the paint I used a combination of sponge and small (cheap) artist brushes. I applied the primer and most of the first coat with the sponge brushes and used the artist brushes for the second coat and the eye. It needed a second coat to make the colors really pop. Then I put three coats of clear polyurethane to seal the paint…I always wait at least a week or two before I use anything with poly on it, to give the polyurethane time to cure (ie. harden)…not sure if it really matters, it’s just what I do…and that’s it…we now have a fun table for the porch that cost less than $40.00…And my friends are amazed…You gotta love that :>))  Karen M.

What Is Your Ratio Of Happiness?

I realize that we all think about our happiness, but what if we counted the percentage of  time we weren’t. I have a formula that has always worked for me, remember, we are just pondering  my perspective.  I strive for 75% of the time… I must be happy. I allow 25% for all the crap that I cannot control. This is my way of keeping my life and the direction of my life in check. I always think about this every morning… Saying “Stephen, you have to find happiness in at least 75% of this day” And believe me it’s not always easy… sometimes I am left with nothing but to start the day all over again!  I am determined to live my best life. Making the effort to find happiness in my life is so important that I really don’t want to give up even 25%!  But, I realize that my life will never be perfect, so this is why 75% is so precious to me.

Think of your happiness in terms of a checkbook, if the balance falls too low, we take the necessary actions to correct  the balance, a transfer from savings, working overtime, etc. So… if your happiness falls too low, take the necessary action to correct your “balance.” Live your life in the black, not in the red! I mean set a realistic ratio for yourself and try to live it.

I know a lot of you may think this is just hogwash, but think about your happiness in terms of percentages. Putting a number on it will only inspire you to make the necessary changes.  Set a goal of happiness for yourself, and if you fall below that number, make the adjustments! After all it is your life, your happiness, and your checkbook!   Stephen Spurling

A Porch Is A Porch

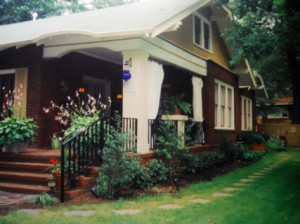
        This house needed to be what I call “un-remodeled”. Years ago someone thought it would be a great idea to enclose the front porch…NOT! I think that a porch is a porch… and that thinking goes double if you live in the south! Just look at the curb appeal of this open front porch, and then look at the  picture of when it was enclosed!  I have never had so much fun subtracting heated square footage from a house! The hardest challenge of this improvement project was returning the interior brick back to its orignal color. When they enclosed it, they left the brick walls exposed on the inside room  and painted them white. I know your thinking I had the brick sandblasted, but I didn’t. I painted it with a like color matching the exterior brick. I used a paint sprayer and then a sponge with a slightly lighter color of the brick to match the existing brick. I of course had to build a corner support (column) and add a handrail.

Yes, these are drapes that you see hanging outside. Drapes on a porch create temporary privacy, intimacy and they just look great! Okay… a secret about the drapes… they are not drapes. I bought painters canvas drop cloths at Home Depot. They work great as they are made to be water-resistant and that helps to keep them from getting dirty and moldy. Besides they are cheaper than buying fabric at the fabric store. I think the pictures tells the whole story as to whether I did the right thing  on this “un-remodel” project… Stephen Spurling


Heart.

The heart has always been a symbol of love, courage, and devotion. Heart and Soul are two words often found together,

and for good reason. It is through the heart that the soul expresses itself. The heart is the organ that keeps us alive

physically, and it is the central source of our emotions and feelings. We know when someone is speaking from the heart, and

we know when our hearts have been touched. It has nothing to do with logic or being rational; knowing is a feeling. When we say

that someones heart is in the right place we know that regardless of the outward appearance of that person’s life, his or her intent

is soul felt and honest.

How is your heart feeling? Is it sad, happy, light or burdened? Is your heart in the right place? To know what is in our hearts

takes effort and time, for we must practice listening to the voice within. Don’t go to sleep at night with a sad heart; take time

to lighten your heart with the universe. Open your heart to the universe each night before you go to sleep, and it will bring joy

to your soul and wings to your ideas.

My Heart is happy, light and full of love.

Angel Wisdom. Chabby Chaberek

Winter

Without winter, how could we possibly appreciate the spring“?

Winter is the season of reflection and challenges. In the rythm of natural cycles, it corresponds to that part of us

that must conserve our resources, draw inward, and allow ideas and situations to hibernate and awaken in their own time.

Winter is a time of opposing forces that teach us beauty through harshness. The cold both chills and invigorates us. The

snow and ice can be fierce in their fury or breathtaking in their pristine purity. The long hours of darkness make us yearn

for the day while appreciating the stillness of the night, the warmth of the evening fire. Through winter we learn the art

of patience and the joy of discovering new inner strengths, as we wait for growth to emerge.

At times in your life when you experience the chill of winter-the frieze of activity, the harshness of painful experience, the despair

of the lengthening darkness–the universe may be telling you to draw inward, to look within for understanding and solutions, and

to release the old in order to prepare ground for the new.

A Reflection: I rest in the night to be ready for the day.

Angel Wisdom: Chabby Chaberek

Progress

“Progress is not always visible, but It’s always in progress.”

Sometimes progress is such a subtle process that we don’t know if it’s happening to us. Things may

seem unchanged at the surface: we may become doubtful or frustrated by an apparent lack of movement.

But the universe remind us that progress is a process of moving slowly and surely. It does not happen in an instant;

it does not announce itself with grand fanfare and excitement. Rather, each action we take towards our goals is

like carefully setting brick upon brick, building slowly and steadily until one day we step back and realize the house is completed.

If you have been working steadily toward a goal but wish you could make faster progress, think

about how far you have already come and trust in the process.

Even through it may not always  seem like it, I am always progressing

Angel Wisdom,  “Chabby Chaberek