Repurposing an Old Door

https://tankinz.com/ppnwpwg1zcy            
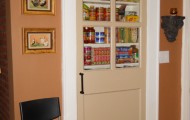
I have a thing for old doors. Old doors with character should ever end up in the landfill. I had an exterior door on my 1930 bungalow that was architecturally special, but functionally obsolete. In other words ,it didn’t work as the old back door. However,  the door would stay in its original home as I moved it from the outside entrance, and it has  found a perfect spot as my new pantry door! Yes, I put a glass door on a pantry closet… and guess what?  Everyone that has seen this update to my kitchen notices the door and not what was in my pantry. That could be a fear most of us have with a glass door. Guests seeing our jumbled boxes and canned goods. But the beauty of this door jumps out so much, that the contents of the pantry becomes secondary! Look at the pictures below and ask yourself, would you entertain the thought of a glass door for your pantry? This a true testament to broadening your thoughts about the hidden pantry , or some other obscure spot in your home, ( think linen, or utility closet,) and saving a wonderful old door.


Tramadol Pills Online  

Buying Tramadol  


Deck+Stain=COLOR!

https://asperformance.com/uncategorized/dht5bh2k1m I know. Everyone dreads having to stain or restain their decks.  We recently had to tackle this project while creating a new outdoor living space for ourselves.  I don’t know about you, but we have tired of the myriad of browns that are available.

http://countocram.com/2024/03/07/e7ier227 Upon searching for a stain for our deck project, we were happy to find color as an option.  The  green we chose set up a beautiful green blue hue that created quite a wow factor in the yard, and harmonized beautifully with nature. It also gave us the opportunity to use the color for accent pieces on our outdoor furniture, and inspired some beautiful container gardens.

Can You Order Tramadol Online So, next time you have to stain a dreary deck, think color!

Online Tramadol Mastercard  


Hot Staging Trends in 2013

The clutter is cleared. The house is clean. Now, what accessories and accents can you use to make a room look fresh and modern? Try chunky woven blankets, reflective surfaces and tangerine combined with neutral shades.

Other Ideas:

Mother Earth Inspired Elements. Nature is popular this year. popular color palettes are reminiscent of natural elements-reds found in earth and soli, blues of the sea, lush greens of the rain forest, and neutrals that draw from the softer, textured look of eggs, seashells, and sand. the natural tones are being paired with color accents, such as Tangerine. Also look for accessories that incorporate natural elements such as woven baskets, leather stools and cotton towels.

Fabulous Faux. Think zebra stripe rugs or leopard print votives. But beware: use animal prints in small doses only.

Digital Fabrics. Framing a piece of digital fabric is a great way to create an inexpensive piece of artwork. Try textiles with fern or tree branch patterns.

Not your grandmothers Doilies. Add lace in subtle ways-on top of tablecloths or paired with bold colors. Traditional quilts and crochet peices are also popular.

Faded Area Rugs? Vintage is in Vogue! Instead of ditching that old Asian rug, use it as the foundation for your rooms color and aesthetic palette. Add modern artwork and accessories that compliment vintage pieces.

Opposites Attract: Think silk with suede, furniture with studs, “shiny with vintage”.

Touch the Sky: Think about clouds and water when choosing reflective white, blue and silver objects and hardware. Mirrors are great for staging as they make the room look much larger. Also consider mirrors in other ways, such as for a tray holding a tea-cup and saucer or on a wall in an area where there isn’t a lot of light.

Bottom Line: Have fun and let your creativity shine.

Chabby. Southern Smarts

Photo courtesy of Elle Décor.


From a Sows Ear to a Silk Purse. Oak Island Beach Cottage.

In 2004, I was on the hunt for a beach cottage. I did not want something that someone else had already renovated I wanted to put our own spin on it. The deals are out there, especially now with the real estate market being what it is today. Having a sweet summer, weekend, or retirement getaway is quite affordable if you are willing to put that old “sweat equity” into play. That’s exactly what we did. When I was looking there was not much on the market that I would term affordable. One weekend I was invited to a friend’s home on a quiet and quaint barrier island off the NC coast, Oak Island. My friends had purchased property there and really wanted us to do the same. While we were searching we came across this horrible little “shack” on a double lot on the beach side of the island. It came complete with a junkyard on one side of the lot and the house, well it looked like it was a tear down.It had to be one of the worst properties I had ever considered. Rotten siding, decrepit porch, built out of cinderblock, and the interior was a mess! When we say a mess, one cannot imagine that the smell of cat urine and the fleas jumping on our legs were the only stimulation that we got as we toured the place with our Realtor.

Through vision and flea bites we could see the good bones. The home had vaulted beamed wooden ceilings and a fireplace. The kitchen, which appeared to be an addition, was large in comparison to the rest of the cottage. There was a partially built side addition with a large window in the front. It had a large backyard full of the islands name sakes, live oaks.

As you view the before and after photos you will be able to get the drift on how bad this little place was. The cottage is built predominantly with cinder block which is good from a possible hurricane perspective, but aesthetics on the interior with cinderblock walls was not going to work. To counteract this problem I decided to stucco all the interior walls. this was a daunting task, with potential for serious “carpel tunnel”.  I can tolerate  a little pain for fashion.

As budget was minimal we were going to do all the work ourselves, and had 90 days to bring it to completion. With this being a “fun house” I decided to let my imagination run wild where color was concerned. I selected a wonderful light green named ‘Independent Gold” with Sherwin Williams paint for the living, dining and small den. For the kitchen, I decided on a bright purple,  a periwinkle blue for the Master bedroom, and a bright gold for the guest room. With cement floors and a limited time frame, we decided on a glue down wood parquet for the floors as carpet was a non option with kids, sand etc. The small den had wood planks for flooring, and I painted them a bright white high gloss. For the exterior we were going to go with bright coral for the body of the house, purple for the peaks, and “Atlantic Green” for the shutters. We would  trim the house in white. We also added a deck on the right side and front, and built a covered front porch with decorative molding. The house felt dark, so we resolved this problem by using full French doors on the front and side entrances.  This enabled bright sunshine to enter the house, plus gave the house a real beach bungalow feel. For the interior, to keep the space feeling as open as possible, I opted to use full french doors for the bedrooms as well. For privacy I installed shades on the back of the doors so they may be closed for guest and family. This kept the interior bright and open.

Once all the construction work was complete, it was time to address furnishing the place. Now I am a flea market tag sale kind of guy. I knew I had some great old things in the basement, that with a  little updating and paint, would be fun, economical, and downright interesting. I wanted the place to have personality, be chic, welcoming and comfortable.

Upon arriving back in the city, I started my quest to get the house ready for my first week at the beach. I stopped by my local shops and found some very interesting fabric remnants.  I painted lamps and table,s and made three upholstered headboard which I covered with a plain off white canvas purchased at my local home improvement store. All I have to say is thank goodness for electric staple guns. They sure make the job a lot faster and with greater ease.

The end result is a great stylish little beach retreat that brings me more joy and relaxation than I could have ever imagined, and it cost a fraction of what I thought.  As a matter of fact. my beach neighbors loved what we had done so much, they asked us to consult as they prepared to redo their little cottage. We will be posting a story on that renovation in an upcoming article.

Remember style and comfort do not have to cost an arm and a leg. It just takes a little imagination. And if you find yourself cruising down Oak Island Blvd, feel free to stop by “Not The Hamptons ” and say hello. The iced tea with a hint of mint is always chilled. 🙂

Chabby 😉


A Small Kitchen With A Big Bang!

 This small kitchen was turned into a dream kitchen without adding any square footage. So when working with limited space, does size really matter? No. What matters is how you design the space you have for your needs and what pizzazz you can create. Remember pizzazz fits in any space!  The most precious commodity in a small kitchen is the counter top space. This kitchen was designed with a built-in microwave cabinet below the counter top and an oversized single farm sink that holds large platters, both saving countertop space. The great contemporary/ traditional chandelier anchors the kitchen with “stand out” design. During the renovation we actually found an orignal plastered archway over the sink that had been hidden from  a previous renovation… Why???  I was so excited to find this original archway as it’s true architecture for the age of the house. What a classy design in a small space that works for the homeowner and the chandelier is the real icing on the cake! Stephen Spurling

A Renovated House, Renovated All Wrong!

This 1930’s house was renovated in the first picture (exterior white)…YIKES!  Do you think with this renovation; plate-glass windows, a patio instead of a porch, and lets not forget the vinyl siding were really a good choice for a 1930’s bunglow?I’ll answer for you… NO! I found a picture of the original house and spared no expense to return it to its original character. I rebuilt the front porch, replaced the plate-glass windows with the original style, and removed all the vinyl siding.(2nd picture) So after looking at the second picture, which renovation was better? I don’t think I have to answer this one for you! Stephen Spurling

A Porch Is A Porch

        This house needed to be what I call “un-remodeled”. Years ago someone thought it would be a great idea to enclose the front porch…NOT! I think that a porch is a porch… and that thinking goes double if you live in the south! Just look at the curb appeal of this open front porch, and then look at the  picture of when it was enclosed!  I have never had so much fun subtracting heated square footage from a house! The hardest challenge of this improvement project was returning the interior brick back to its orignal color. When they enclosed it, they left the brick walls exposed on the inside room  and painted them white. I know your thinking I had the brick sandblasted, but I didn’t. I painted it with a like color matching the exterior brick. I used a paint sprayer and then a sponge with a slightly lighter color of the brick to match the existing brick. I of course had to build a corner support (column) and add a handrail.

Yes, these are drapes that you see hanging outside. Drapes on a porch create temporary privacy, intimacy and they just look great! Okay… a secret about the drapes… they are not drapes. I bought painters canvas drop cloths at Home Depot. They work great as they are made to be water-resistant and that helps to keep them from getting dirty and moldy. Besides they are cheaper than buying fabric at the fabric store. I think the pictures tells the whole story as to whether I did the right thing  on this “un-remodel” project… Stephen Spurling


Painting An Exterior Brick House

I have painted many brick homes. I usually find a reason to do this as there are very few brick homes that look good with natural brick. Let me explain myself. I usually renovate older homes and the brick that was used back then wasn’t as pretty as the brick used today. I also like the fresh clean look of painted brick. The home I am featuring in this blog was in terrible shape, the brick had many mortar cracks, and we all know that when you do a mortar patch it never matches the existing mortar, and stands out like a sore thumb! Well to be honest, I would have painted this home whether it need mortar repairs or not, the natural brick just wasn’t attractive.

A quick FYI about mortar cracks, they are ok if they run in a”stair step” fashion, of course they need to be filled (re-pointed) to keep moisture out. If the mortar cracks run horizontally then it is can be an indication of a shift in the foundation, a more serious fix, and a whole other conversation.

I will let you decide which is better, painted brick or not. I realize the “before” picture is not a fair comparison as it was taken before it was renovated. However ,you must admit the painted brick “after” picture really brings the home back to life! It is an updated 50’s ranch! Stephen   

The Custom Potting Shed

This is the cutest potting shed that I built off site and attached  it to the house once it was complete. There are several great things about this potting shed. It can be attached anywhere on your house, and by doing this, you only have the cost of building 3 walls (the back wall is your existing house). You can make it any size you need, this particular shed was built on a decked patio in a small courtyard.( finished size was 2′ x 4′) The picture shows just how well it was incorporated into the existing townhouse. (paint color and making it conform to the existing architecture). Finally the real cute part of this custom job was a recycled door. I got this door from another job and had it in storage waiting for just the right project. I realize that most of you don’t have this option, but I can tell you that Habitat for Humanity resale stores have great old doors that are very reasonable. And as you can tell with this little shed, the door is the crown jewel! Plus recycling an old door is just a really good thing.( saves you money and it doesn’t end up in the landfill). I do think the plastic Rubbermaid storage shed will serve the same purpose , but won’t be as sturdy  or last as long and certainly doesn’t have the same “wow” factor of this little potting shed! So the next time you’re in the market for a potting shed, build one with character!  Stephen Spurling

A Quick Head To Toe “Flip”

I have renovated  a bunch of houses over the years and this one was the worst, but turned out to be my favorite. We were able to finish this ” head to toe” renovation in 4 months! I felt the most like an Artist with this renovation as I started out with very little bones. Once I got into it… well let’s just say  the few bones I thought it had, were broken! EXAMPLE:The house was built in the early 1940’s and this was about the time they started using plywood as sub-flooring… Well it being a new product… the original builder installed it improperly. I want you to understand the proper way to install plywood but it would probably bore you. Let’s just say that I had to take up all the hardwood floors and re-lay new plywood. Do you get my point in telling you this, the house needed way more than a face lift. I had a vision for this project and I am the type that had to follow thru or the project would have just became “work”. I, of course saw money disappearing from my pockets with all the broken bones!(way over budget) Knowing full well that my vision for the house could not be compromised. I just worked faster in an effort to saving as much money as possible on carrying costs, so I could keep my vision alive!  We could have a 10 page discussion on what it took to renovate this house, but these before and after pictures say it all! Stephen Spurling